Introduction
Hey, what’s up, everybody? I hope you are doing well. Today, we are going to learn how you can make your property listing app using the Laravel framework. In this property listing app laravell tutorial, you will get the basics of a listing app. If you practice it properly, you can make it more robust, functional, and elegant in the future.
Before that, you just had to download a fresh copy of Laravel from GitHub & connect your preferred database. In this case, I’m using MySQL. And then, just follow the steps below. So, we will be creating a simple property listing app, right?? Then, we need some models for our application. OK, there can be a User, Listing, Payment, etc.
What You Will Learn From This Property Listing App Laravell Tutorial
You will learn the basics of the listing application development along with some advanced techniques which you can use those techniques in your future project.
Creating Model, Migration & Controller for Listing Property
Now, Let’s create our Listing model, migration, and controller php file using the artisan command. Open your terminal from your project root directory and type the command below.
php artisan make:model Listing -mcr
First, we will add some fields to our Listing migration file. You could also add or remove fields from migration as per your demand. Now, Simply copy and paste it into your Listing migration file.
<?php
use Illuminate\Database\Migrations\Migration;
use Illuminate\Database\Schema\Blueprint;
use Illuminate\Support\Facades\Schema;
return new class extends Migration
{
    /**
     * Run the migrations.
     */
    public function up(): void
    {
        Schema::create('listings', function (Blueprint $table) {
            $table->id();
            $table->integer('user_id');
            $table->integer('property_id');
            $table->boolean('status');
            $table->timestamps();
        });
    }
    /**
     * Reverse the migrations.
     */
    public function down(): void
    {
        Schema::dropIfExists('listings');
    }
};
No. Let’s go to our next step: open your Listing model and add fillable property from our migration file like below.
protected $fillable = ['user_id', 'property_id', 'status'];
Now, your terminal, let’s migrate our Listing model using the following command.
php artisan migrate
Now, it will confirm that our migration file has been migrated. Hurrah, we have completed our second step successfully. Now, let’s move on to our third step.
Creating Model, Migration and Controller for Property
Now, we will create a model, migration, and controller for our Property model, the same as our previous model. Write the below command on your terminal again.
php artisan make:model Property -mcr
Now, in our Property migration file, we will add some necessary fields to work with, and again, you can customize this migration file to your satisfaction. Now, just copy and paste this code into your Property migration file.
<?php
use Illuminate\Database\Migrations\Migration;
use Illuminate\Database\Schema\Blueprint;
use Illuminate\Support\Facades\Schema;
return new class extends Migration
{
    /**
     * Run the migrations.
     */
    public function up(): void
    {
        Schema::create('properties', function (Blueprint $table) {
            $table->id();
            $table->string('name');
            $table->integer('price');
            $table->text('location');
            $table->timestamps();
        });
    }
    /**
     * Reverse the migrations.
     */
    public function down(): void
    {
        Schema::dropIfExists('properties');
    }
};
Next, you have to add the fillable property of our Property model, so you have to copy and paste the line below into your Property model.
protected $fillable = [‘name’, ‘price’, ‘location’];
Now, in your terminal, write down the following command to migrate our Property model, and after the command, we will go to our next step.
php artisan migrate
Creating Model, Migration and Controller for Payment Model
Next, we are going to create our next model, which is our Payment model. Now, write the command below to generate our model, migration, and controller for our Payment model.
php artisan make:model Payment -mcr
Now add some relevant fields for the payments table as well as your needs. We are adding very simple fields; now, again, you can add more or remove them as per your preferences. Now, do copy and paste the code snippet into your payment migration file.
<?php
use Illuminate\Database\Migrations\Migration;
use Illuminate\Database\Schema\Blueprint;
use Illuminate\Support\Facades\Schema;
return new class extends Migration
{
    /**
     * Run the migrations.
     */
    public function up(): void
    {
        Schema::create('payments', function (Blueprint $table) {
            $table->id();
            $table->integer('invoice_number');
            $table->integer('user_id');
            $table->integer('amount');
            $table->timestamps();
        });
    }
    /**
     * Reverse the migrations.
     */
    public function down(): void
    {
        Schema::dropIfExists('payments');
    }
};
To add the fillable property to the Payment model, please copy and paste the below line inside your Payment model.
protected $fillable = ['invoice_number', 'user_id', 'amount'];
Once you have added the fillable property, run the following command in your terminal to migrate the Property model.
php artisan migrate
After running the command, we can move on to the next step.
Install Laravel UI for Front-end Scaffolding
Yeah! It’s very exciting that we have completed our previous six steps; now, let’s work with the front-end designs a little bit for the best outcomes. So, the first thing is we must ensure that a user can create its property for submission as a listing; that’s why I would like to change the designs of the home.blade.php view file.
Another thing is, in our property listing app laravell project, we are using Laravel UI for front-end scaffolding; at this stage, we just need to install Laravel UI from their GitHub repository using the following commands.
I’m giving you the process of the installation of Laravel UI in a list view that will make more sense.
- First, In your project root directory, you must open your terminal and paste the following command composer require laravel/ui and press enter.
- After completing the Laravel UI installation, you must also write a command for scaffolding for the front-end stuff php artisan ui bootstrap –auth.
- Next, You must type npm install && npm run dev to compile the CSS and JavaScript files of our project.
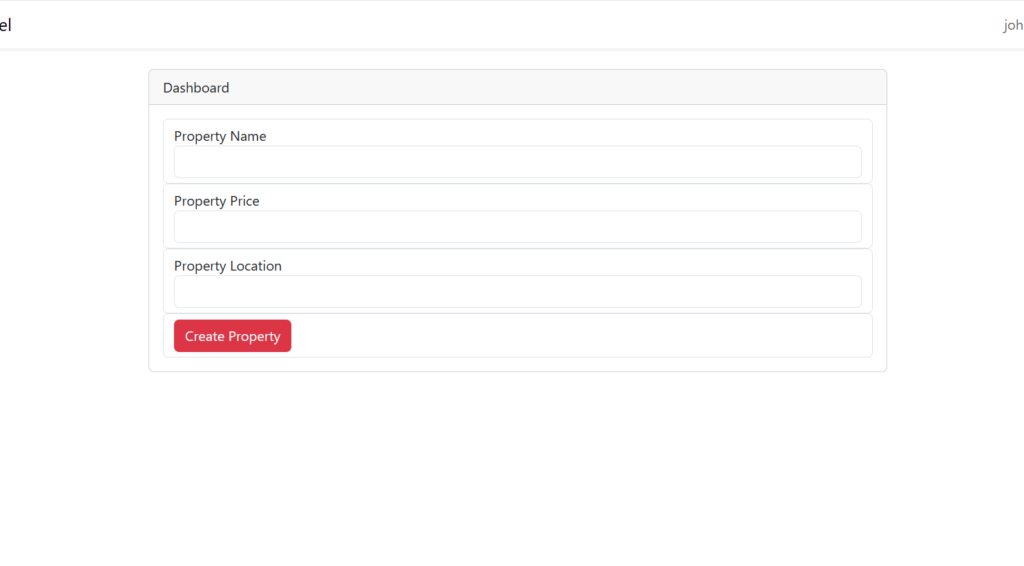
Creating Home Page for Creating Property
Now, you have completed your Laravel UI Installation, and then you have to add some HTML markups for a user so that it can make property. Just copy the following snippet and paste it into your home.blade.php view file.
@extends('layouts.app')
@section('content')
<div class="container">
    <div class="row justify-content-center">
        <div class="col-md-8">
            <div class="card">
                <div class="card-header">{{ __('Dashboard') }}</div>
                <div class="card-body">
                    @if (session('status'))
                        <div class="alert alert-success" role="alert">
                            {{ session('status') }}
                        </div>
                    @endif
                    <form action="{{ route('save.property') }}" method="POST">
                        @csrf
                        <div class="form-control">
                            <label for="name">Property Name</label>
                            <input type="text" class="form-control" name="name">
                        </div>
                        <div class="form-control">
                            <label for="name">Property Price</label>
                            <input type="text" class="form-control" name="price">
                        </div>
                        <div class="form-control">
                            <label for="name">Property Location</label>
                            <input type="text" class="form-control" name="location">
                        </div>
                        <div class="form-control">
                            <button type="submit" class="btn btn-danger">Create Property</button>
                        </div>
                    </form>
                </div>
            </div>
        </div>
    </div>
</div>
@endsection
Creating Route
Now, at this stage, you just must add this line of code in your routes>web.php file.
Route::post('save-property', [\App\Http\Controllers\PaymentController::class, 'save'])->name('save.property');
Create Logic for Property Create for our Property Listing App Laravell
Next, in your PropertyController, just copy and paste this code inside into the controller from here.
<?php
namespace App\Http\Controllers;
use App\Models\Property;
use Illuminate\Http\Request;
class PropertyController extends Controller
{
    public function save(Request $request)
    {
        $request->validate([
            'name'  => ['required'|'string'],
            'price' => ['required'|'integer'],
            'location'  => ['required'|'text'],
        ]);
        Property::create([
            'name'  => $request->name,
            'price' => $request->price,
            'location'  => $request->location,
        ]);
        return redirect()->route('home');
    }
}
Create Page for Displaying Created Properties
So, we have completed our previous step; now, let’s create our next step, which is displaying user properties on a particular page. In this case, we want to show user properties in the properties.blade.php file. Also, we must add a button for a user to submit their particular property for listing. Now, all you must do is create a new page called properties.blade.php in the views folder, and after that, you have to copy and paste the code snippet below into your blade file.
@extends('layouts.app')
@section('content')
<div class="container">
    <div class="row justify-content-center">
        <div class="col-md-8">
            <div class="card">
                <div class="card-header">{{ __('Dashboard') }}</div>
                <div class="card-body">
                    @if (session('status'))
                        <div class="alert alert-success" role="alert">
                            {{ session('status') }}
                        </div>
                    @endif
                    <table class="table">
                      <thead>
                        <tr>
                          <th scope="col">ID</th>
                          <th scope="col">Name</th>
                          <th scope="col">Price</th>
                          <th scope="col">Location</th>
                          <th scope="col">Event</th>
                        </tr>
                      </thead>
                      <tbody>
                        @foreach($properties as $key => $property)
                        <tr>
                          <th scope="row">{{ $property->id }}</th>
                          <td>{{ $property->name }}</td>
                          <td>{{ $property->price }}</td>
                          <td>{{ $property->location }}</td>
                          <td><a href="{{ route('new.listing') }}" class="btn btn-danger">Submit for Listing</a></td>
                        </tr>
                        @endforeach
                      </tbody>
                    </table>
                </div>
            </div>
        </div>
    </div>
</div>
@endsection
After that, paste this code on your PropertyController.
public function showProperties()
    {
        $properties = Properties::all();
        return view('properties', [
            'properties' => $properties
        ]);
    }
Also, don’t forget to add this line of code to your web.php file.
Route::get('new-listing/{id}', [App\Http\Controllers\PaymentController::class, 'newListing'])->name('new.listing');
Finally Create PaymentProcessing for Property Listing App Laravell
<?php
namespace App\Http\Controllers;
use App\Models\Property;
use App\Models\Listing;
use App\Models\Payment;
use Illuminate\Http\Request;
class PropertyController extends Controller
{
    public function newListing($id)
    {
        $property = Property::find($id);
        Listing::create([
            'property_id' =>$id,
            'user_id' => \Auth::id(),
            ' status'   => true,
        ]);
        Payment::create([
            'invoice_number' => rand(1, 999999999),
            'user_id' => \Auth::id(),
            'amount' => $property->amount,
            ' status'   => true,
        ]);
        return redirect()->route('home');
    }
}
At this stage, we have completed the rest of the procedures. Finally, we need to add some code to our PropertyController to submit a property for listing.
After the user submits a property for listing, an admin can approve or decline the property. Although we did not talk about this functionality in our tutorial, maybe we will discuss it in another future post.
At last, we will start our local server using our artisan command, which is. php artisan serve If there is no problem, our project is now running at http://127.0.0.1:8000/ or http://locahost:8000/.
Final Demo of the Property Listing App Laravell Tutorial
Conclusion
Finished! This is all about our tutorial. Although this tutorial cannot make you an expert in developing such an application, it will give you some fundamental knowledge of how to make this kind of application in the future. Thank you so much for reading the whole tutorial from the beginning. If this tutorial helps you a little bit, then don’t forget to share this post on social media. If you have questions, suggestions, or tips regarding this post, then let us know via our Contact Us page.